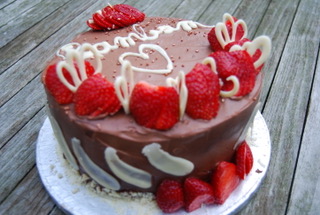
The Richest Darkest Chocolate Cake
- decadentfoodblogger

- Jan 12, 2019
- 4 min read
Digging into a muddy and moist chocolate sponge with a soft smooth rich icing is a highlight of a great meal.
This cake recipe came about when I saw a recipe for chocolate cake using mayonnaise and stout and I really wanted to try it but chose to incorporate those ingredients with a chocolate cake recipe that I have made several times and like a lot.This recipe isn't as simple but it is worth the extra effort.
This chocolate dream cake is exactly that and will make anyone coming back for another serving .
The first time I made this cake was for my Grandfather's birthday so the pressure was on to not make a cake where you could taste mayonnaise or stout!
You will need 3 different ingredients:
Espresso powder
Stout - this makes the gooey but not as much as brownie, rich and add a little kick to the taste of a chocolate cake
Mayonnaise - mayonnaise is really not my thing but I promise in this cake you cannot taste it and really makes the cake airy, moist and rather creamy in a funny kind of way.

Ingredients:
For a 3 tiered cake
For the sponge:
230 grams flour
80 grams dutch processed cocoa powder
1 teaspoon salt
1 teaspoon baking soda
1 teaspoon baking powder
275 ml stout
1 tablespoon vanilla extract
1 tablespoon espresso powder
200 grams soft butter
280 grams caster sugar
3 eggs
125 grams mayonnaise
100 grams dark chocolate, chopped
For the whipped ganache:
100 grams dark chocolate
100 ml double cream
200 grams mascarpone
For the buttercream:
150 grams unsalted butter
200 grams icing sugar
a pinch of sea salt
To top:
Melted white chocolate
10 washed strawberries
White chocolate in thin small shards
Optional: Sprinkles
Recipe:
Pre-heat your oven to 170˚C
Prepare 3 tins by greasing them and placing a circle of parchment paper on the bottom, don't forget to grease the sides! I like to use spring-form tins
In a large bowl, sift the flour, baking powder, baking soda, salt and dutch-processed cacao powder and mix together until combined
In small jug, combine the espresso powder, stout and vanilla
In a large bowl, cream together the butter and the sugar until nearly white in color and airy, scraping down the sides of the bowl occasionally.This can take up to 5 minutes.
Gradually add in the eggs, one by one and mixing in between each egg.
Add the mayonnaise and mix, you will notice the mixture becoming lighter and creamier
Incorporate the dry ingredients to the mixture and the jug full of wet ingredients, a third of each mixture at a time.
Cut the dark chocolate into pieces
Incorporate the chocolate chunks into the batter and mix with a rubber spatula
Divide the mixture between the 3 tins
Place into the pre-heated oven
Bake for 25-35 mins, or until a tooth-pick comes out clean when poke inside
Set aside to cool for 10 mins
Take the cakes out of their tins and cool until cold on a metal rack
To make the icing, melt the chocolate and take off the heat
Incorporate your cream, slightly warm to the touch.
Place your ganache aside and cool
Cream the butter with half of the sifted icing sugar, adding it in a little at a time
Reserve the buttercream for the crumb coat , you use the buttercream (as it is firmer than the ganache) to create a "crumb-coat" which is basically a layer of icing you put in between the layers of cake and around the cake to seal in the crumbs so that when you put on the second layer of icing, no crumbs will be visible, I used all of the butter cream for this part.
Once the ganache is completely cooled, whip it up in the stand-mixer or hand-mixer until airy and not quite firm, adding in a little at a time the remaining icing sugar.
Once you have made your crumb coat set the cake in the fridge for 30 minutes
Take your cooled ganache and whip it up in a stand mixer until lighter in color and firmer and add your mascarpone
Set your whipped ganache aside
Take your stacked cake out of the fridge and spread on your ganache so that it coats every side .
TIP: It is much easier to take of icing then to put it on so a tip is to put more icing then you will need and then scraping the sides with a palette knife but a usual knife works well too.Set in the fridge for 1 hour
If you want you could place the melted white chocolate into a piping bag and write whatever you liked on a piece of parchment paper that when the word or pattern is firm, you could place on the cake as decorations.I wrote the name my family made up for someone in the family and the first time I made this cake, it was for his birthday. I also made little flowers in white chocolate. Be careful when you take them off the sheet of parchment paper because they are very delicate.
To top , cut the strawberries into slices but don't make the knife slice through them completely so that at the top they stay together when you fan them out to make a nice effect
Place the white chocolate shards on the bottom of the sides of the cake
Place the chocolate writing or patterns and fanned-out strawberries on the top of the cake or on the sides.
Optional: Sprinkles


Comments